Sunday, April 28, 2013

Crock Pot Cranberry Chicken

I got this extremely easy recipe from a friend and tweaked it just a touch. It is super yummy over rice with a side of veggies.


Crock Pot Cranberry Chicken
  • 4 Boneless Skinless Chicken Breasts
  • 1 can Whole Berry Cranberry
  • Dry Onion Soup
  • 1/2 C. French Dressing (I used California French Dressing)

Put thawed chicken in crock pot and cover with Cranberry sauce and French Dressing. Sprinkle the Dry Onion Soup mix on top. Add in as much as you'd like! I'm not a huge onion fan, but you're welcome to put the entire soup package in. Stir well. Cook on high for 2 hours then shred chicken. Cook longer if needed. My crock pot cooks extremely fast! Tastes perfect over rice :) Enjoy!


Healthier No-Bake Cookies

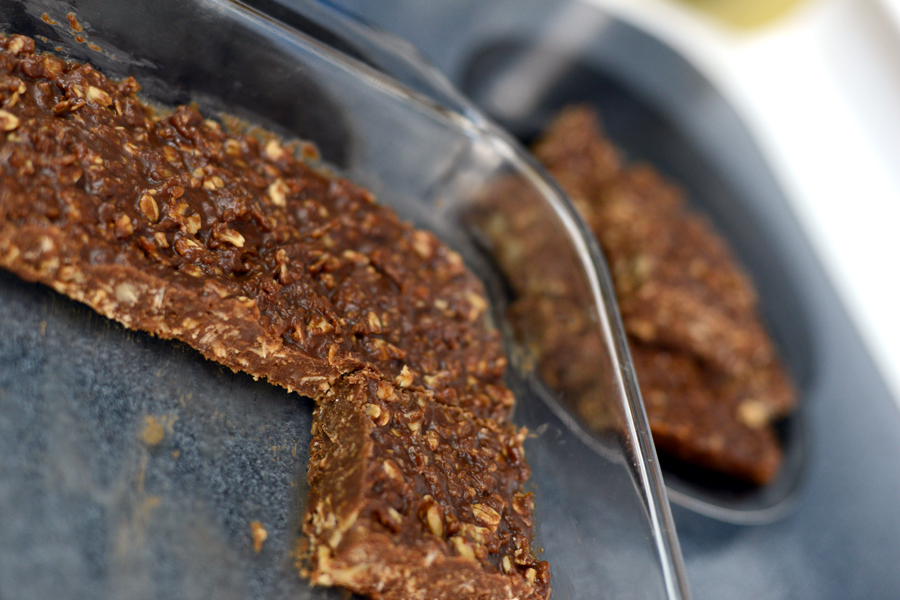
These no-bake cookies are so yummy! I seriously can't stop eating them. It's a good thing they're a bit healthier than the normal no-bake cookies... and A LOT softer and chewier too! (plus their FULL of fiber)


Healthier No-Bake Cookies

1 cup peanut butter (crunchy or smooth! Sometimes adding more nuts is yummy!)
1/2 cup honey (I halved honey and agave nectar)
1/2 cup butter (I used I Can't Believe It's Not Butter. Another option is Coconut oil)
2 cups dry oats
1 C shredded coconut
1/4 C chopped walnuts
1 1/2 cups Carob Chips
1 t vanilla extract

Melt peanut butter, honey and butter over medium-low heat. Once melted, remove from heat or keep on low heat and add oats, shredded coconut, carob chips and vanilla. Stir until entirely melted. It takes a while for the carob chips to completely melt, but if it looks too think don't be afraid to add in more peanut butter, honey or agave!


Pour into a 9x13 pan and cool in the fridge. When it's set, cut into bars and enjoy. Store in the fridge. 


Unlike normal no-bake cookies, these bad boys stay chewy and soft. The only way to harden them is to keep them in the fridge (but they STILL stay soft!). We had some friends over for a BBQ this past weekend and I got a lot of compliments on the cookies. The first comment just about everyone said was "I hate how flaky or crumbly normal no-bake cookies are. I love how these are soft and chewy!!" To make them more finger accessible I used a scoop and put them on a cookie sheet. If you do this, lay them on wax paper!!

Monday, April 22, 2013

Fiesta Ranch Dip

I kid you not, this dip is the best dip you'll EVER have. I'm totally serious. When a friend of mine brought it over last year for a little bbq, my husband and I practically inhaled it! I made it for Emberly's first birthday and got so many compliments. Now, every time I make it for family dinner everyone hovers around the chip bowl and comments how gooood this dip is. Yesterday my Aunt and Grandparents joined us for our monthly Gailey family dinner. They HAD to know who made it and HOW to make it. Yes, it's THAT good.. and now I'll share how it's done!

FIESTA RANCH DIP
At least one 16 oz tub of Sour Cream
4.25 oz can of chopped olives
4 oz can diced green chile peppers
Packet of Fiesta Ranch dip
Shredded cheese

If you'd like your dip FULL of flavor, use one 16 oz tub of sour cream. I typically use 1.5 to 2 tubs. There's no right or wrong amount of shredded cheese. Just keep stirring it in until it looks and tastes just right!
Not only tastes great as a chip dip, but also PERFECT for veggies!

Tuesday, April 16, 2013

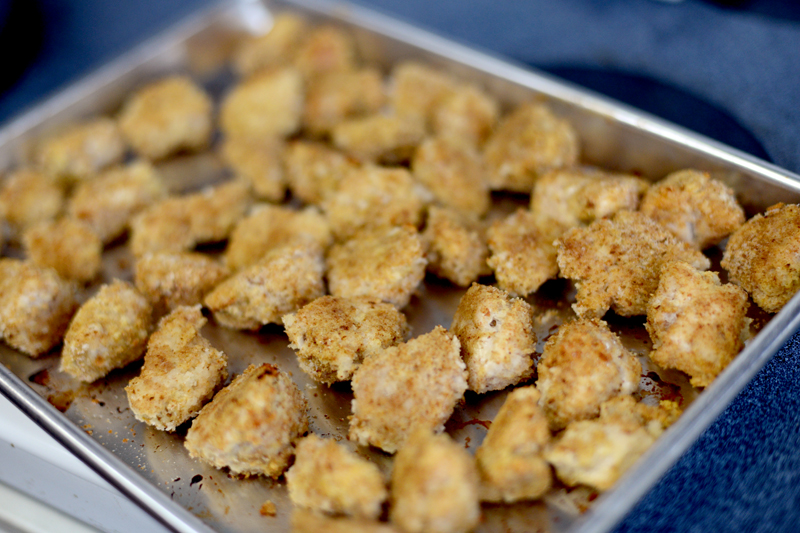
Baked Popcorn Chicken

Toss out those unhealthy chicken nuggets and deep friend popcorn chicken! Try this super yummy, and much healthier version of popcorn chicken.

Baked Popcorn Chicken

  • Cooking Spray
  • 2 large egg whites or egg substitute
  • 2 Tbsp Spicy Brown mustard or Dijon mustard
  • 2 cups Panko Breadcrumbs or make your own!
  • 1 1/2 pounds of boneless skinless chicken breast, cut into 1-inch cubes
Heat oven to 450 degrees. Coat baking sheet with cooking spray. In a medium bowl, whisk together the egg whites, mustard and salt. In a shallow bowl spread the breadcrumbs.


Add the chicken pieces to the egg mixture. Transfer chicken to breadcrumbs and coat thoroughly. Place breaded chicken pieces on the baking sheet. Arrange them closely, but not touching. When all of the chicken is on the baking sheet, spray them lightly with cooking spray.


Bake for 15 minutes, then use a spatula or tongs to flip the chicken pieces. Continue baking another 5-10 minutes until golden brown.


I made my own breadcrumbs by placing 4 slices of whole wheat bread in the oven as it preheated. When they started getting crispy I took them out and put them in my amazing Blendtec!


All in all, it was super yummy and I served it with green beans, homemade mac and cheese (I will have to post that one the next time I make it!), apples and oranges! Yum yum!

Racin' for Greyson!

Last Saturday Ian and I ran our first 5k together... with Emberly in the stroller. It was actually my very first 5k. I ran cross country and track in high school. My 3 mile time varied from 24-32 min... considering we sometimes ran in 115' weather, I didn't find my faster times too bad. But regardless... that was 10 years ago! I really haven't run that much since.
I heard about this charity 5k from my wonderful friend, Krista. She has a fabulous blog where she writes about her life with her 17 month old son, Mack, who in my mind is kicking kidney failure in the butt! Although that is an entirely different story in itself. So please, if interested, check out her blog! She is an excellent writer. https://kidneyking.com

Now onto Racin' for Greyson! 

I've always wanted to run a 5k or a half marathon, but was didn't want to pay the money for it. Running for a cause was A LOT easier for me to drop a check than having it go towards another event the following year. The 5k was $20 a person and all the proceeds went towards 4 year old Greyson. He has a rare disease called Actin 1 Mutation that should have taken his life within 4 months of birth. It is extremely rare to see someone else with this disease because it usually takes their life early. But like Mack, he is kicking his disease in the butt and fighting for a brighter future xoxo
I'm proud to announce that running a 5k was WAY easier than I expected. I kept thinking to myself... why on earth was this so hard for me in high school!? And again I'm reminded about the ridiculous amount of heat that we dealt with in Bakersfield, CA. I finished the 5k (without walking! Only had to stop a few times to pick up our water bottle & jacket the kept falling out of the stroller) in 30:22! Ian finished slightly before me, pushing Emberly the entire time. He, of course, was embarrassed because he could have ran at least 10 min faster. It is SUPER hard for Ian and I to run, jog, or workout together. I'd love to have a leisurely jog with him, but to Ian, everything is a race. He doesn't know how to jog.. he just knows how to RUN. I was so proud of him to hold back and just enjoy the run together as a family :)
Here's us with Krista, Brent and Mack! I love this boy so much and I'm so inspired by the strength and courage that these sick/disabled children AND their parents have. Like my nephew with Down Syndrome, everyone I know that has a child with health issues/disability has an amazing support group. They all look out for each other and support one another. I seriously LOVE IT. It's like a special group that you wish you could be a part of, but as much as everyone in the group loves one another, they wish they weren't even in it. Thanks for telling us about the event guys! It was a great experience and I totally want to do it again! ♥

Thursday, April 11, 2013

Stiletto Cupcakes!

The 2013 Youth Theme for the LDS Church is "Sand Ye In Holy Places"
Doctrine and Covenants 87:Wherefore, stand ye in holy places, and be not moved, until the day of the Lord come; for behold, it cometh quickly, saith the Lord. Amen.
To go along with this years theme, our joint Young Women Mutual activity was to make some super cute stiletto cupcakes! I've been in the YW Secretary for a little over a year now and totally love these girls! It was so much fun to see all of the girls stilettos come together... or not come together ;)


Here are the easy steps! Frost 2 cupcakes. Decorate top by dipping the cupcake into a bowl of sprinkles and/or colored sugar. Dip Milano cookie (or wafer) in melted white chocolate. Pipe edges with frosting (we just used a lunch bag and cut a hole in it). Press frosting edges into sprinkles or colored sugar. Cut Pirouette in half diagonally. Cut a slit into the cupcake and press in Milano. Glue Pirouette to the Milano with melted white chocolate and you're done! No, mine is not a perfect masterpiece, but it sure does look cute! If you want to see PERFECT cupcakes, check out this link!


Did you know you can make your own colored sugar? I had NO idea before this activity! Just put sugar in a bag, drop a few drips of food coloring, and smoosh around until the sugar absorbs all the color!

And here are the cute cupcakes the young women made!!


Krista is in YW with me, she is a Laurel adviser. I love having a close friend in there with me! These are our cupcakes :)

Tuesday, April 9, 2013

3 Day Military Diet

While on Pinterest I came across "How to Lose Up To 10 Pounds In 3 Days on The 3-Day Diet!" so I checked it out. It seemed easy enough. I mean seriously, who doesn't want to lose up to 10 pounds in 3 short days?? Anyway, the link I got the info from had SO much on it, so I wanted to post the main details on my page for easier access.
My first week on the diet I lost 5 pounds! This was a big deal to me. I was 140 with a goal in mind of 128 (my pre pregnancy weight). I will admit, I cheated a little here and there. I'm used to snacking on whatever I give my 2 year old! So to not be able to pop a piece of cereal in my mouth or a tater tot was tough! After 4 days off the diet, I kept it all off and felt the skinniest I'd felt in a LONG time. For once I could actually feel my abs without poking through an inch or more of flubber. Week 2 on the diet I lost 1 pound. I wasn't upset... because I gave up on day 3 and ate a normal dinner. What?? My hubby had cooked dinner forgetting about my diet. I didn't want to hurt his feelings!
So, was my 1 pound weight loss the fact that I ate a normal dinner the 3rd night, the fact that I substituted some of the food and cheated a little or because I have nothing left to lose? I'm not sure. I'll have to try another round WITHOUT cheating to find out. But regardless if I follow the diet to a T, I still feel 100% less bloated. I guess I didn't realize how easily I bloat on a daily basis.
And a big shout out to my mommy who was VERY skeptical but tried it out anyway. She lost 6 lbs the first 3 days and even lost 2 more lbs on her 4 days off! She's on round 2 of the diet this week :) Plus I told a friend of mine and she dropped 7 lbs in 3 weeks! Only 3 more to go to get to her pre pregnancy weight :)

Without further adieu...

The Actual Diet Plan

3 Day Diet

DAY 1:
Breakfast--1/2 Grapefruit, 1 Slice of Toast, 2 Tablespoons of Peanut Butter, and Coffee or Tea (I do not drink coffee or tea, so instead I had 1/2 a chocolate protein drink)
Lunch--1/2 Cup of Tuna, 1 Slice of Toast, and Coffee or Tea (any brew, as long as it's caffeinated. Again I had 1/2 a protein drink instead)
Dinner--3 ounces of any type of meat, 1 Cup of Green Beans, 1/2 Banana, 1 Small Apple, and 1 Cup of Vanilla Ice Cream. Try warming the apple and/or banana and eat them over the ice cream. Delicious!

DAY 2:
Breakfast--1 egg, 1 Slice of Toast, and 1/2 Banana
Lunch--1 Cup of Cottage Cheese (Or 1 Slice of Cheddar Cheese), 1 Hard Boiled Egg, and 5 Saltine Crackers
Dinner--2 All Beef Hot Dogs (no buns), 1 Cup of Broccoli, 1/2 Cup of Carrots, 1/2 Banana, and 1/2 Cup of Vanilla Ice Cream

DAY 3:
Breakfast--5 Saltine Crackers, 1 Slice of Cheddar Cheese, and 1 Small Apple
Lunch-1 Hard-Boiled Egg, and 1 Slice of Toast
Dinner--1 Cup of Tuna, 1/2 of a Banana, and 1 Cup of Vanilla Ice Cream

This diet works on chemical breakdown and is proven. Do not vary or substitute any of the above foods. This is for a reason. It's not so that you eat yucky food or to make it sound like a diet. The foods on the menu work together and provide the proper chemical reactions in the body that will boost metabolism, provide energy, help with sugar swings and jump start the fat burning process. Salt and pepper may be used, but do not use any other seasoning. The diet is to be used for three days at a time. In three days you should lose up to 10 pounds. After three days of dieting, you can eat your normal foods, but do not over do it. After four days of normal eating, you may start back on the 3 day diet again. You can lose up to 40 pounds in a month if this diet is followed precisely.
This is a safe diet and can be used by many different individuals and body types. Exercise is recommended.
REMEMBER: Do not eat/snack between any of the meals!
NOTE: Coffee or tea for the first two meals of Day 1 only. Water only from then on. Water intake is always unlimited anytime. I did add Crystal Light to a lot of my water.


Food Choices Explained

Toast = 1 slice of whole wheat bread. Toasted or  not toasted.
Peanut Butter = Can be home pressed or bought by the jar for convenience.
Coffee or Tea = Plain, black coffee or tea that is caffeinated. Nothing added.
Tuna = Fresh or Canned tuna fish.
Any type meat = May be fresh, or canned meat. Includes but not limited to: Seafood, beef, pork, or poultry.
Vanilla ice cream = Plain, straight, and regular vanilla ice cream. Nothing added.
Egg: Where it's not specified, the egg can be cooked in any manner that you prefer.
Saltine crackers = Plain soda crackers. If not available, just use plain crackers.
Hot Dogs: Beef franks, turkey franks, etc. Franks with only one type of meat. The cheap, mixed meat with unhealthy fillers, are not recommended.
Slice of Cheddar = About two ounces of cheddar cheese.

TESTED AND APPROVED ADDITIONS
  • Splenda
  • Small amounts of mustard
  • Small amounts of relish
  • Lemon pepper
  • Sugar free gum and mints

Don't drink coffee or tea? Here's some substitutions, although the diet is not proven to work the same.

Coffee or Tea =
  • Sugar free hot chocolate (the kind mixed with hot water)
  • This one is not on the actual diet but it worked for me. Either a cup of instant breakfast or a Chocolate protein drink with LOW sugar. I drank Premier Protein.

#1 RECOMMENDED TIP!

  • Drink "at least" half of your body weight in "ounces" of water 7 days per week.

Thursday, April 4, 2013

Creamy Tomato Tortellini Soup

Yesterday I made the yummiest dinner! Or at least I thought it was super yummy. Emberly wanted nothing to do with it and just ate apple sauce...  I'm sure she would have loved it if she gave it a try.
I saw this post going around on Pinterest, made a few tweaks and here you have it!

Creamy Tomato Tortellini

2 minced Garlic Cloves
2 Tbl Olive Oil
2 10 3/4 oz Cans of Condensed Tomato Soup
2 Tbl Tomato Paste or you could add in
1/4 cup diced Tomatoes 
2 cups Half-and-half
2 cups Chicken Stock
1 tsp Onion Powder
1 Tbl Italian Seasoning
1/2 tsp Salt
1/2 tsp Pepper
1 19 Oz package of
frozen Cheese Filled Tortellini
Parmesan Cheese, for garnish


Saute garlic with the olive oil in a large stock pot over medium heat until golden brown.
Add tomato soup, tomato paste (or tomatoes), half and half, chicken stock and spices.
Bring to a simmer and stir well.
Once simmering, drop tortellini into the soup. Cook and stir for 2-5 minutes until the tortellini are fully cooked.
Ladle soup into bowls and top with Parmesan Cheese. YUM!

Wednesday, April 3, 2013

Cotton Candy Cupcakes / 2nd birthday

Yes, the last food post I made was seriously a year ago.. for Emberly's 1st birthday. I'm so horrible. I will try to my best to keep you updated with yummy recipes! I've been trying new things, but haven't been photographing them and sharing them. I wasn't intending to post this since I used my camera phone, but I figured I'd share anyway! 
So, as you may have seen in a previous post, Emberly is 2! I once again made cupcakes for her party with my family. This time I made something totally different (as far as cupcakes go). I made Cotton Candy Cupcakes!
Here's how I made them
1 box Funfetti cake mix (follow instructions on box)
2 pkts Duncan Hines Cotton Candy Recipe Creations Flavor Mix
1 can Duncan Hines Frosting Starter kit (sold next to the flavor mixes)
Sprinkles
1 cup white chocolate chips

1. Preheat oven to 350 degrees
2. In a large bowl, mix together the cake mix and ingredients on box. Add in ONE packet of the cotton candy mix with a rubber spatula until blended and combined. Stir in the white chocolate chips.
3. Scoop an even amount into 24 muffin tins. Bake 16 minutes or until edges are lightly golden and center is set. Allow to cool completely before frosting.
4. Stir the remaining flavor packet into the can of icing. I put the icing in a frosting bag to swirl it. Then topped liberally with sprinkles.

ONE NO NO.. learn from me! The cotton candy mix WILL turn your cupcakes blue. I decided I wanted them pink... so I added in food coloring. I should have known better that blue and red made purple.... which looks brown when baked. Should have stuck with the blue... it would have looks so much more fun! Regardless, Emberly loved them and they were TOTALLY yummy!

Woo hoo for being 2!


Wednesday, March 27, 2013

MY DIY Play Kitchen

Okay everyone, here it is! The exciting post you've all been waiting for :) Seriously, I've had a lot of people ask so many questions on how the heck I made this super darling play toy! Here's the answers, in pictures of course. Sorry about the low quality photos in the beginning! But to start out, just like everyone else I saw all these darling play kitchens on Pinterest that were made out of old entertainment centers. I pinned many of them... for several several months, if not a year. Then decided, what the heck! Let's do this! Of course my husband really wanted no part in this project. He had other things to worry about... like refinishing the kitchen and bathrooms. So I took on the challenge myself. We have no room at our house, so I built it in my parents basement. Because it wasn't in my own home, it took a about a month to make, and 3 months to finish it completely!
There she is. Before and After. I was determined to make this beauty AS CHEEP AS POSSIBLE. Everyone I looked up spent at least $150 on their kitchen. I wanted to find anyway possible to cut that price significantly! Found this entertainment center on KSL (local listings) for $20 I think, I talked her down to $10. SCORE!
We had to sand it down and cut a hole for the sink. My dad totally didn't have the right tools.. but it seriously made the entire experience way more fun. I'm totally not kidding. I loved our bonding time screwing things up and making their basement dusty and smokey from cutting wood with tools we shouldn't be using!
 Next was the paint. We were fortunate to have a lot of left over paint in our house from the people who lived here previously.. and of course from all the times we've repainted. I mixed a darker blue and a cream to get this super pretty sky blue.
Since my parents just moved into their home they had leftover laminate. So we used a piece around the kitchen sink. The stainless steel bowl was donated and the faucet was purchased on KSL for $10. Once again listed as $20 and I talked them down.
 We removed the original doors completely. My father in law has a wood shop in his backyard with SO MANY scraps! He was so awesome to cut me some pieces for the freezer door, fridge door and oven door.
 The stove is the VERY best part of this kitchen! I've seen everything from spray painted CDs, black coasters, to pipe cleaner bent into coils. There's no way I was going to ruin my kitchen with those things when I could photoshop one of my own. So yes, I designed the stove myself. I researched different photos of stove tops and there you have it! I printed it on photo paper and stuck it on with mod podge. That thing ain't goin nowhere!
I AM NOW SELLING PRINTS OF THE STOVE TOP HERE!
I was SO excited when my sister told me they had left over bead board. There's no way I was going to pass up an offer for FREE bead board. It took 3 pieces. One and a half for the kitchen wall and one inside the fridge to cover up the holes. We just glued it right over the original piece of wood.
 We got an 8x10 piece of plexi glass for the oven door. Having the oven see through and painted black makes a world of difference! So much more realistic.
 Now we move on to the window! One of my favorite parts! I found the image  online from a free desktop image download website. I printed it out, purchased more plexi glass and made a little frame. I glued all of this onto a piece of cardboard then hung it onto the kitchen wall.
  Here is where I ended for about a month. But Emberly could care less if it was finished or not! She loved cooking hotdogs, french fries and potato chips on the stove :) Please pay no attention to the appearance of a soggy bum. But on top of the kitchen you'll notice some new additions I was working on. The shelf and a chandelier!
And they're on! Lights up and everything :)
Now we'll move on to some MUCH better photos to show you all the details and the 100% completed kitchen yay!!
 I love the curtains! My sister is so crafty with a sewing machine and sewed them up all cute for me!
 I put an old dish rack in the oven. Works just fine for now!
 Doors open to see the inside of the very stocked fridge and freezer! We did use the original shelves and screwed them into the sides. The hinges were a little bit of a hiccup! I bought them before I realized that they wouldn't attach flush to the inside of the fridge. So we had to add in wood blocks. Looks funny, but at this point I didn't care. I got the soft closing hinges in.. and that's ALL that mattered to me.
 
 Grandma and Grandpa Atkins had an old corded phone to donate to the kitchen! I love hearing Emberly say "hello?! babble babble gibber jabber"
 Why yes she is washing her hair in the sink. Doesn't everyone do that? ;)
 So there you have it! Isn't it the cutest kitchen you've seen?! I think so, but then again I'm pretty biased. Next I will add in the expenses!

Used entertainment center found on KSL (local listings) - $10
Faucet also found on KSL - $10
Blue and white paint and paint brushes/rollers - FREE already had it
Bead board - FREE it was donated (yay!)
Stainless steal bowl - FREE also donated
Laminate counter-top - FREE donated
8x10 plexi glass from homedepot - $1.97
11x14 plexi glass for window and wood pieces for window frame - $5.31
Black spray paint for oven - $0.97
Soft closing hinges from Ikea's discounted section - $3 for a bag full (score!)
Stainless steel small fridge and oven handle (2 pack) from Ikea - $8.99
Stainless steel large fridge handle from Ikea - $6.99
6 pack of black knobs for stove from Ikea - $1.99
Fabric 1/4 yard, 1/8 yard and another 1/8 yard from Hobby Lobby - $2.50
12x12 print for window from Costco - $3.19
Print of stove from Pixels Foto - $4.54
(I AM NOW SELLING PRINTS OF MY STOVE TOP HERE)
Pod Podge - FREE already had it
Hinges for oven from homedepot - $2.96
Shelf and apron hanger from DI - $1.50 (75 cents each)
Screws/bolts/washers and a drill bit - $8.53
Corded phone - FREE donated
Dish rack for the oven - FREE already had it
And the most expensive piece, the Black Locker Chandelier - $19.62

Grand total spent on kitchen = $90.07 and worth EVERY penny!